Blank Roof Inspection Form
Key takeaways
When filling out and using the Roof Inspection form, keep these key takeaways in mind:
- Accurate Information is Crucial: Ensure that all fields, such as inspection date, inspector name, and structure details, are filled out accurately. This information is essential for tracking the roof's condition over time.
- Document Previous Work: Include a brief description of any past maintenance or repairs. This history can help identify recurring issues and inform future inspections.
- Be Thorough with Condition Ratings: Use the provided codes (Good, Fair, Poor) to assess the roof's condition. This systematic approach allows for easy communication of issues and necessary actions.
- Attach Relevant Documents: If the roof is under warranty, attach a copy of the guarantee. Additionally, note any changes in building use or occupancy, as these can impact the roof's performance.
Common mistakes
Filling out the Roof Inspection form correctly is crucial for ensuring a thorough evaluation of the roof's condition. One common mistake is leaving out important contact information. This includes the roofing contractor's details, the owner's phone number, and email address. Without this information, communication can become difficult, leading to delays in addressing any issues that may arise.
Another frequent error is failing to provide a complete history of previous maintenance and repair work. It is important to describe any past work done on the roof, including the dates and who performed the work. Omitting this information can hinder the inspector's ability to understand the roof's current condition and may result in overlooking critical issues.
People also often forget to indicate whether the roof has been guaranteed. If the roof is guaranteed, it is essential to attach a copy of that guarantee to the inspection form. Neglecting this step can lead to complications later, especially if repairs are needed under the terms of the guarantee.
Lastly, many individuals do not fully describe any changes made to the roof since the last inspection. Whether it’s new penetrations, additions, or changes in usage, these details are vital. They help the inspector assess any potential risks or issues that may have developed due to these changes. Providing complete and accurate information ensures a more effective inspection process.
Misconceptions
- Misconception 1: The Roof Inspection Form is only for new roofs.
- Misconception 2: You only need to fill out the form if there are visible problems.
- Misconception 3: The form is too complicated to understand.
- Misconception 4: The inspection date is irrelevant.
- Misconception 5: You can skip documenting minor repairs.
- Misconception 6: Only professionals can fill out the form.
This is not true. The form is designed for all types of roofs, whether they are new or have been in place for years. It helps track the condition of the roof over time, regardless of its age.
Many people think the form is only necessary when issues arise. However, regular inspections and documentation can catch problems early, preventing more extensive damage later.
While the form contains technical details, it is straightforward. Each section is labeled clearly, making it easy to fill out, even for someone without roofing experience.
The date of inspection is crucial. It provides a timeline for maintenance and helps identify any patterns in roof deterioration, which can be important for future repairs.
Every repair, no matter how small, should be noted on the form. This documentation helps create a complete history of the roof, which can be vital for future assessments.
While professionals often conduct inspections, anyone can fill out the form. Homeowners can provide valuable information about their roof's condition and any changes that have occurred.
Dos and Don'ts
When filling out the Roof Inspection form, attention to detail is essential. Here are five things to do and five things to avoid to ensure a thorough and accurate submission.
- Do: Fill in all required fields completely, including the inspection date and structure information.
- Do: Provide detailed descriptions of any previous maintenance and repair work performed on the roof.
- Do: Note any changes in occupancy or building use since the last inspection.
- Do: Use clear language to describe any conditions observed, such as leaks or structural issues.
- Do: Attach copies of any guarantees related to the roof, as required.
- Don't: Leave any sections blank; incomplete forms can lead to misunderstandings or missed issues.
- Don't: Use vague terms; specificity helps in accurately assessing the roof's condition.
- Don't: Forget to include the contact information for both the owner and the roofing company.
- Don't: Ignore the importance of documenting any emergency repairs that were conducted.
- Don't: Submit the form without reviewing it for accuracy and completeness.
Other PDF Forms
Release of Lien Texas Property - When completed, it enables the removal of the lien from public records.
The California Gift Deed form is an important legal tool for individuals looking to transfer real estate to loved ones without financial exchange. For those interested in more details, exploring the California Gift Deed documentation process can provide valuable insights into its requirements and benefits.
Gift Letter for Mortgage Template - A document to confirm a financial gift for a home purchase.
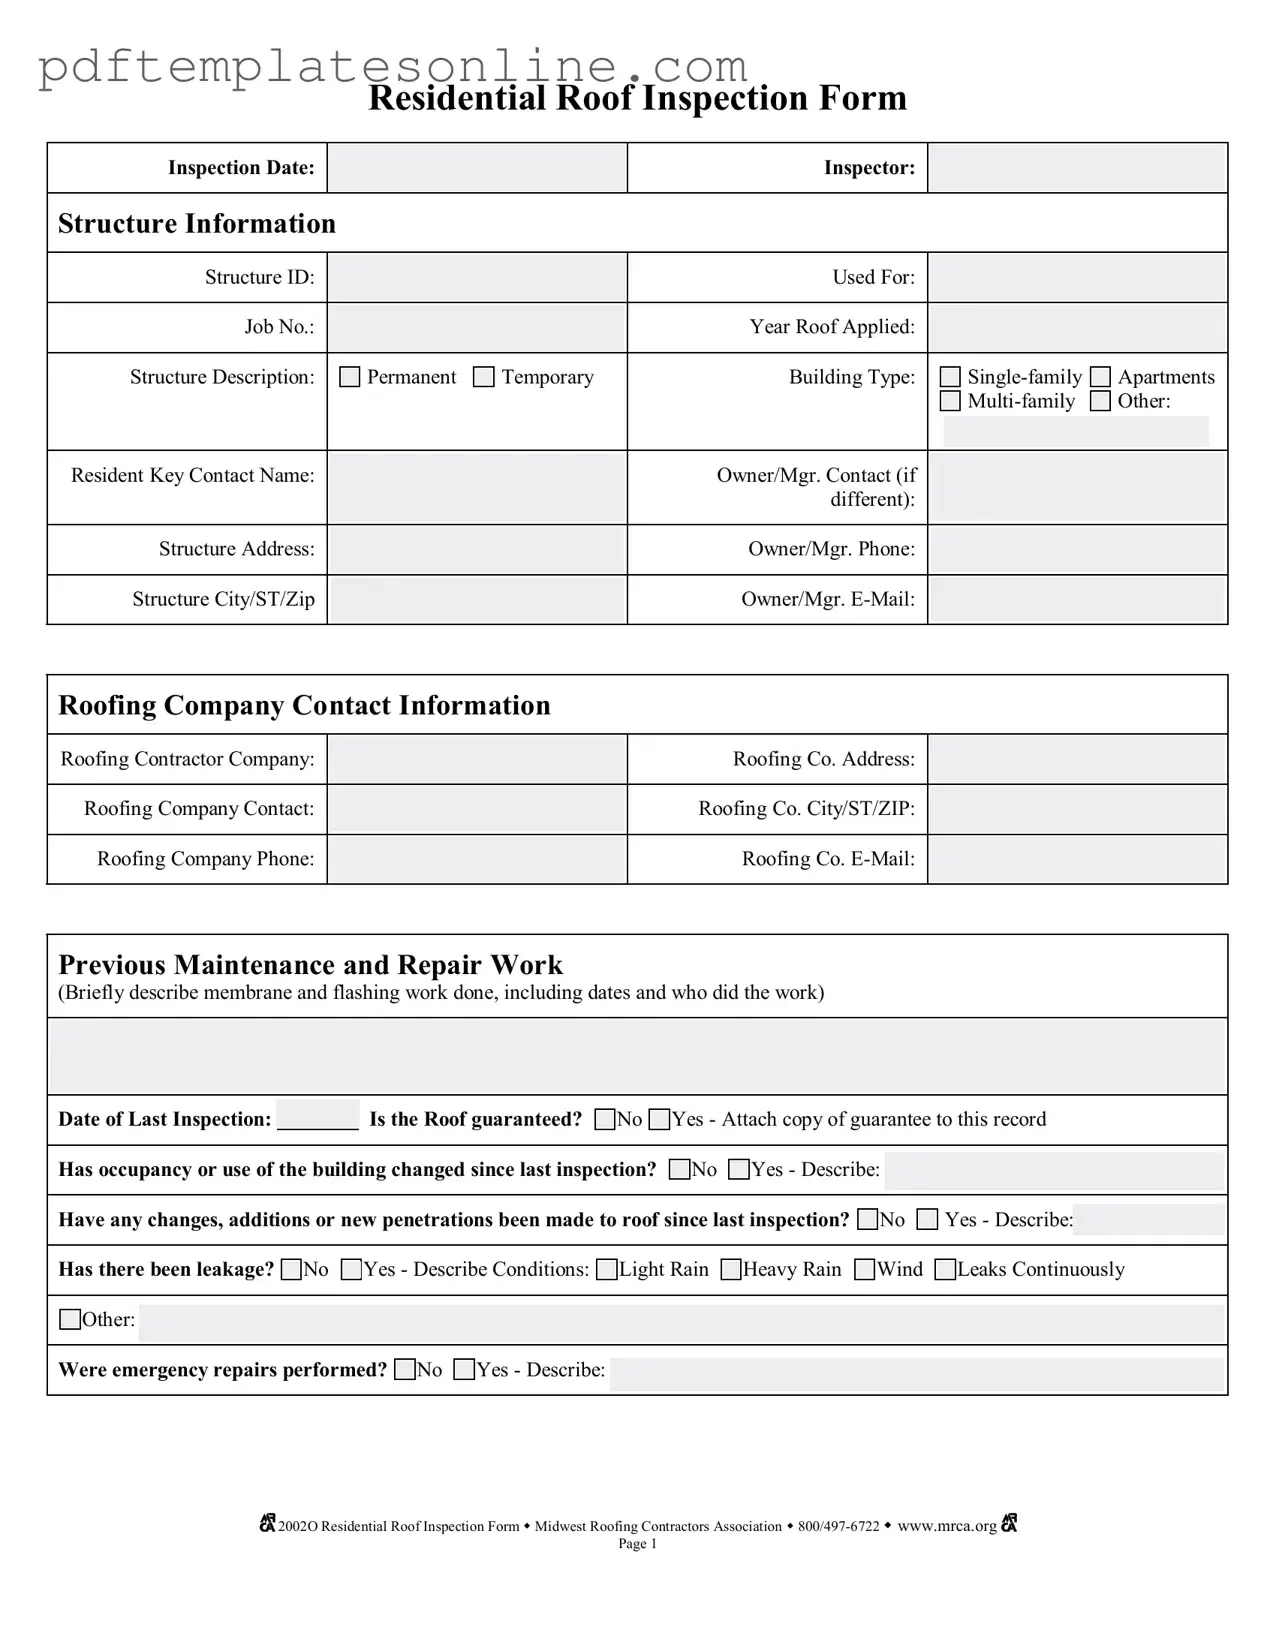
Detailed Guide for Writing Roof Inspection
Completing the Roof Inspection form is an essential step in documenting the condition of a roof. This form gathers information about the roof's current state, past maintenance, and any issues that may need attention. Follow these steps to ensure all necessary information is accurately recorded.
- Enter the Inspection Date at the top of the form.
- Fill in the Inspector name.
- Provide Structure Information:
- Structure ID
- Used For
- Job No.
- Year Roof Applied
- Structure Description (Permanent or Temporary)
- Building Type (Single-family, Apartments, Multi-family, or Other)
- List the Resident Key Contact Name and the Owner/Mgr. Contact if different.
- Fill in the Structure Address, Owner/Mgr. Phone, Structure City/ST/Zip, and Owner/Mgr. E-Mail.
- Provide Roofing Company Contact Information:
- Roofing Contractor Company
- Roofing Co. Address
- Roofing Company Contact
- Roofing Co. City/ST/ZIP
- Roofing Company Phone
- Roofing Co. E-Mail
- In the Previous Maintenance and Repair Work section, briefly describe any membrane and flashing work done, including dates and who performed the work.
- Enter the Date of Last Inspection.
- Indicate if the roof is guaranteed by selecting Yes or No and attaching a copy of the guarantee if applicable.
- Note if the occupancy or use of the building has changed since the last inspection. If yes, describe the changes.
- Indicate if any changes, additions, or new penetrations have been made to the roof since the last inspection. If yes, provide details.
- Record if there has been leakage and describe the conditions (e.g., Light Rain, Heavy Rain, Wind, etc.).
- Indicate if emergency repairs were performed and provide a description.
- Complete the Code Condition section by marking the appropriate code (G, F, P) for various locations and actions taken.
- Mark all items with the appropriate code on the roof plan grid.
- Keep copies of the inspection forms and any photographic or other evidence with the Roof Historical Record.