Blank I 20 Form
Key takeaways
Understanding the Form I-20 is essential for nonimmigrant students in the U.S. This document serves as proof of admission to a school and is necessary for applying for a visa.
- Always keep your Form I-20 with you. If it is lost, request a new one from your designated school official (DSO) immediately.
- Present the Form I-20 to the U.S. consular officer when applying for your visa. Ensure you have the correct one for the school you plan to attend.
- Report to the DSO at your school upon arrival in the U.S. Failure to do so may jeopardize your student status.
- Maintain your nonimmigrant status by being a full-time student and only engaging in authorized employment.
Common mistakes
Filling out the I-20 form is a crucial step for international students seeking to study in the United States. However, many individuals make common mistakes that can lead to delays or complications in their application process. Understanding these pitfalls can help ensure a smoother experience.
One frequent error is providing inaccurate personal information. Students often rush through this section, leading to typos in their names, dates of birth, or passport details. Such inaccuracies can cause significant issues when processing visas or entering the U.S. It is essential to double-check all entries against official documents to avoid these mistakes.
Another common mistake involves financial documentation. The I-20 form requires proof of sufficient funds to cover tuition and living expenses. Some students either underestimate their financial needs or fail to provide adequate documentation. This oversight can result in the denial of their visa application, as consular officers need to see clear evidence of financial support.
Students also often neglect to review the program dates listed on the I-20 form. If the program start and end dates are incorrect, it can affect the student’s visa status and their ability to enroll on time. It is critical to ensure that these dates align with the school's official academic calendar.
Additionally, many applicants overlook the signature requirements. The form requires signatures from both the student and a designated school official. Failing to provide these signatures can render the form invalid. It is advisable to carefully read the attestation section and ensure all necessary signatures are included before submission.
Finally, students sometimes forget to report changes in their circumstances to their designated school official. If a student changes their address, program, or financial situation, they must inform the DSO promptly. Not doing so can lead to complications with their immigration status and affect their ability to remain in the U.S.
By being aware of these common mistakes, students can take proactive steps to complete the I-20 form accurately. This diligence will help facilitate a smoother transition into their academic journey in the United States.
Misconceptions
Misconceptions about the I-20 form can lead to confusion and potential issues with your immigration status. Here are eight common misconceptions clarified:
- The I-20 form is just a school document. The I-20 is a crucial immigration document. It proves your eligibility for a student visa and your acceptance into a U.S. school.
- Once issued, the I-20 is valid indefinitely. The I-20 has an expiration date. You must maintain your student status and comply with the terms outlined in the form.
- Only full-time students need an I-20. Any nonimmigrant student, including those in part-time programs, must have an I-20 to maintain their legal status in the U.S.
- It’s okay to work without authorization if I have an I-20. Unauthorized work can lead to termination of your student status. Always seek written permission for employment.
- I can use an I-20 from any school when applying for a visa. You must present the I-20 from the school you plan to attend. Using a different I-20 can jeopardize your visa application.
- Changing schools is simple and doesn’t require an I-20. You must obtain a new I-20 from the new school and notify your current school to maintain your status.
- The I-20 is not needed for travel outside the U.S. You need your I-20 for re-entry into the U.S. after travel. Ensure it is properly endorsed before leaving.
- Once I graduate, my I-20 is no longer relevant. The I-20 remains important for up to 60 days post-graduation. During this time, you must either transition to another status or leave the U.S.
Understanding these misconceptions can help you navigate your status as a nonimmigrant student more effectively. Always consult with your designated school official for guidance specific to your situation.
Dos and Don'ts
When filling out the I-20 form, it is crucial to follow specific guidelines to ensure accuracy and compliance. Here are six things to consider doing and avoiding:
- Do ensure accuracy: Double-check all personal information, such as your name, date of birth, and country of citizenship, to avoid any discrepancies.
- Do keep a copy: Always retain a copy of your completed I-20 form for your records. This will be useful for future reference.
- Do report to your designated school official: After arriving in the U.S., promptly report to the DSO at your school as indicated on your I-20 form.
- Do understand the terms: Carefully read the terms and conditions related to your admission and stay as a nonimmigrant student before signing.
- Don’t falsify information: Never provide false information or conceal facts on the form, as this can lead to severe penalties.
- Don’t neglect deadlines: Pay attention to important dates, such as the program start date, and ensure you enroll on time to maintain your student status.
Other PDF Forms
30-day Eviction Notice California - Clear communication through this notice can prevent future disputes.
Understanding the California Gift Deed process can be crucial for anyone looking to transfer property without monetary exchange. For detailed information, you can visit a resource that describes how to effectively use a Gift Deed in your transactions, ensuring a smooth transfer: informative guidance on Gift Deed usage.
Counseling Army - The DA 4856 can also highlight a soldier's achievements and strengths.
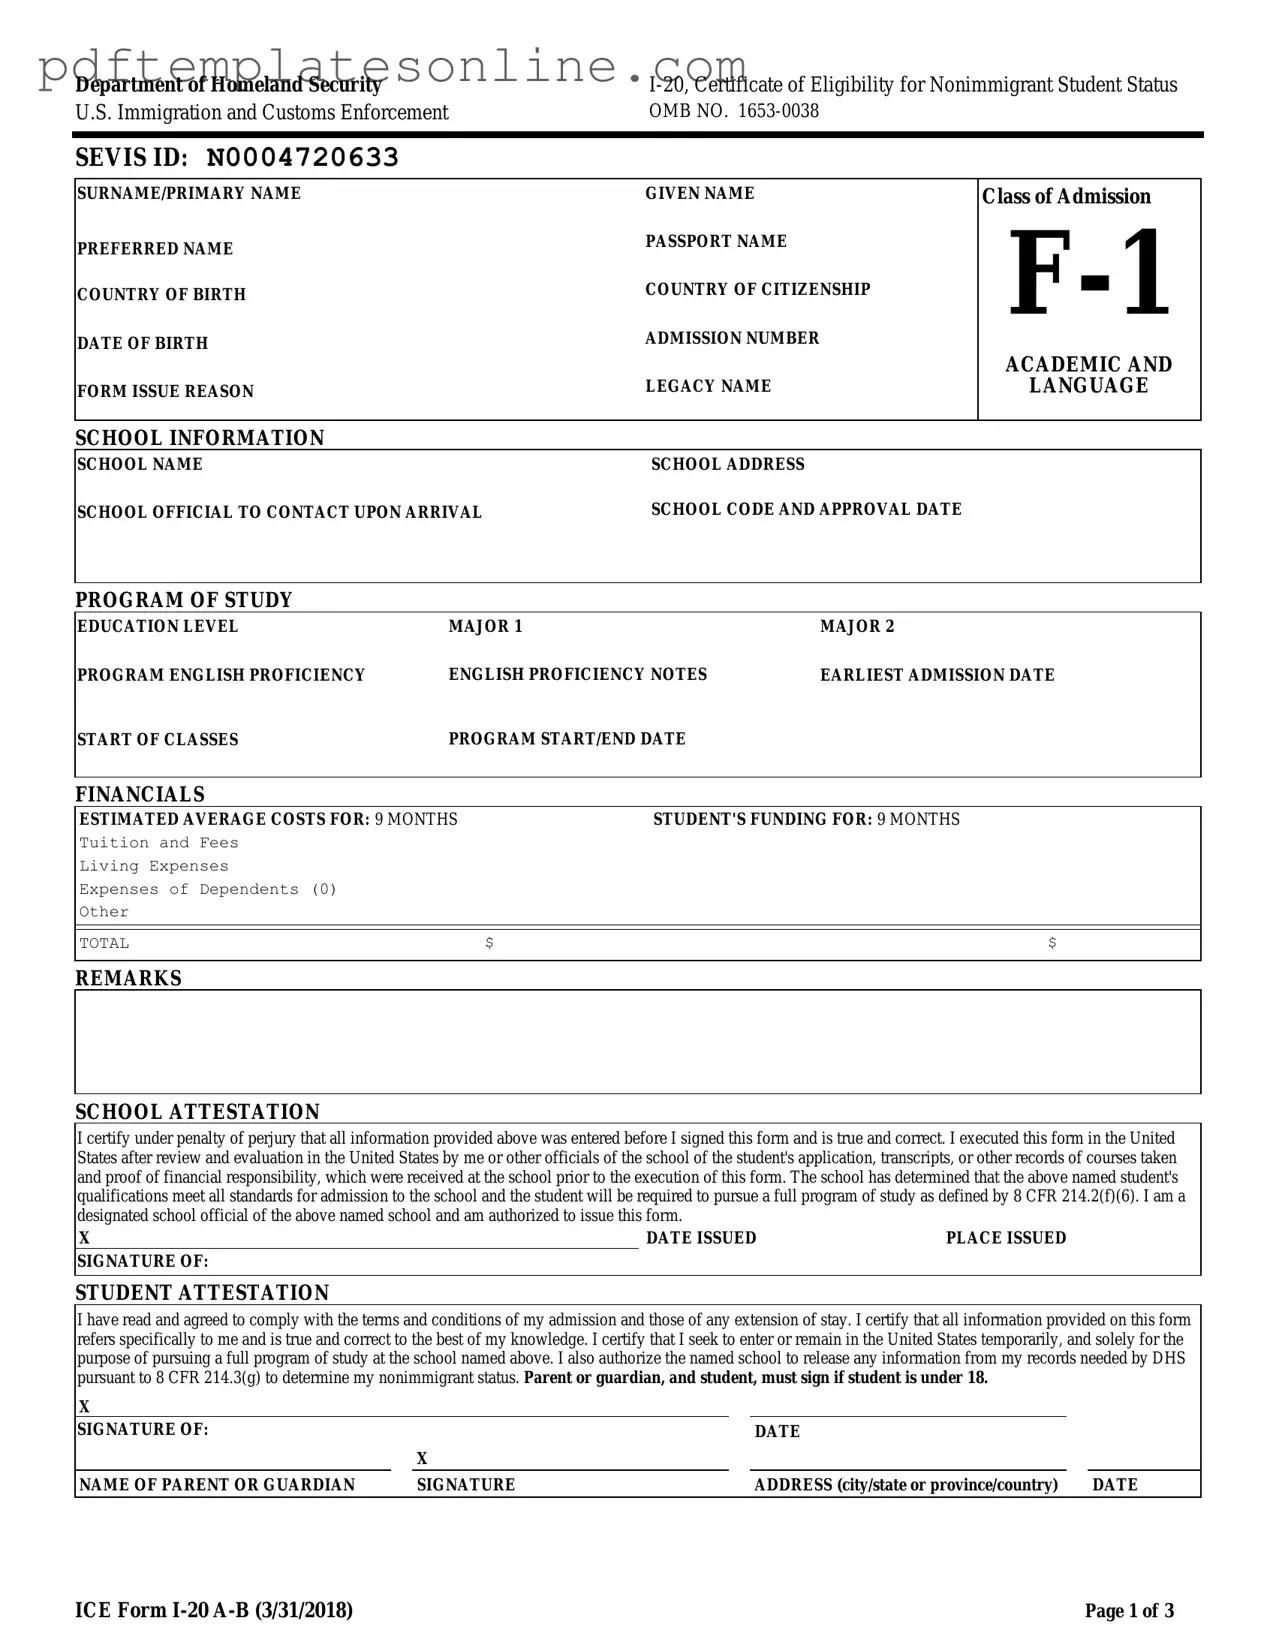
Detailed Guide for Writing I 20
Once you have the I-20 form, it is essential to fill it out accurately. This form is crucial for your application process and must reflect correct information to ensure a smooth experience. Follow these steps to complete the form properly.
- Locate the SEVIS ID number at the top of the form and ensure it is correct.
- Fill in your surname/primary name and given name as they appear on your passport.
- Provide your preferred name and passport name if applicable.
- Enter your country of birth and country of citizenship.
- Input your date of birth in the specified format.
- Write your admission number if you have one.
- Indicate the academic and form issue reason as needed.
- Fill in your school information, including school name and address.
- List the school official to contact upon arrival.
- Provide the school code and approval date.
- Detail your program of study and education level.
- Specify your major(s) and any English proficiency notes.
- Fill in the earliest admission date and start of classes.
- Complete the program start/end date.
- Estimate the average costs for 9 months, including tuition, living expenses, and any other costs.
- Detail your funding sources for 9 months.
- Sign the school attestation section, confirming all information is accurate.
- Complete the student attestation section, ensuring you understand the terms of your admission.
- If under 18, have a parent or guardian sign the form.
- Ensure all signatures and dates are properly filled in before submitting.